-
SplicingViewer is a software incorporating the pipeline, which aims to detect splice junctions and annotate alternative splicing event patterns, and viewer for visualizing the alternative splicing event patterns. The pipeline and viewer are both written in java programming language and require java version 1.6.0 or higher.
-
Step 1: Mapping short reads to the reference genome sequence
Firstly the RNA-Seq reads are mapped to the reference genome sequence with mapping tool by the users, which can generate SAM/BAM format results or whose results can be converted into SAM/BAM format. The user can choose the mapping tool by themselves. The tolerances should be set to allow at most two mismatches. According to the validation between different mapping tools, we recommend users to use BWA as the aligner, not only because it relative high accuracy and multiple threads abilities, but it can also support native SAM/BAM result generating. The conversion of SAM to BAM, sort and index of BAM file can be achieved by SAMtools. Example shell script using BWA as mapping tool can be found here.
-
Step 2: Getting unmapped short reads
After the mapping of short reads to the reference genome, the mapped records contained in the result BAM file in the previous step are used to calculate the depth of coverage of each locus contained in the RefGene model bound with the GATK (The Genome Analysis Toolkit, incorporated into the AlternativeSplicing.jar) in next step. The unmapped records should be converted into fastq read sequences by SamToFastq.jar from Picard ( http://picard.sourceforge.net/index.shtml). Example shell script can be found here.
-
Step 3: Detecting splice juncitons
The step 'sp' contained in AlternativeSplicing.jar were used to get the candidate splice junctions. Input of this step contains reference genome sequence, RefGene in GFF format ( Example, generated from human UCSC RefGene with our python script) , the sorted and indexed BAM result generated in step 1. This step will generate three files in the current "SPresult" directory, which are 'spliceSites.txt ( Example)', 'spliceJunctions.fa ( Example)', 'transShortRun.txt ( Example)'. Example script to run this step can be found here.
-
Step 4: Mapping the unmapped short reads to splicing junction sequence
Map the unmapped reads, generated in the step 2, to splice junction fasta sequences (splicingJunctions.fa). The tolerances should be set to allow at most two mismatches. The SAM result of this step will be used for the following step, and need not to be converted to BAM. Example shell script using BWA as mapping tool can be found here.
-
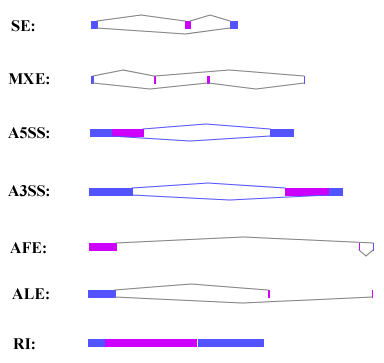
Step 5: Annotating alternative splicing event patterns
The step 'as' contained in AlternativeSplicing.jar were used to annotate the seven alternative splicing patterns, which are skipped exons (SE), mutually exclusive exons (MXE), alternative 5' splicing sites (A5SS), alternative 3' splicing sites (A3SS), alternative first exons (AFE), alternative last exons (ALE), and retained intron (RI). The input of this step contain four files: the RefGene file (GFF format, same as the GFF RefGene file used in step 3), the splicing site text file (spliceSites.txt) generated by step 3, the transcription short run file (transShortRun.txt) generated in step 3, and the SAM file generated in step 4 and contain the reads mapping to splicing site junction sequence. This step will generate the AS patterns result file, whose name can be assigned by the user or named 'AS_result.txt' by default, and the indexed bam file which contain the supported junction reads information. User can also get the splice junction bed format file by add -j option in AlternativeSplicing.jar command line. All the results will be contained in the current AS Result directory. Example shell script can be found here.
-
Step 6: Use viewer to visualize the alternative splicing patterns
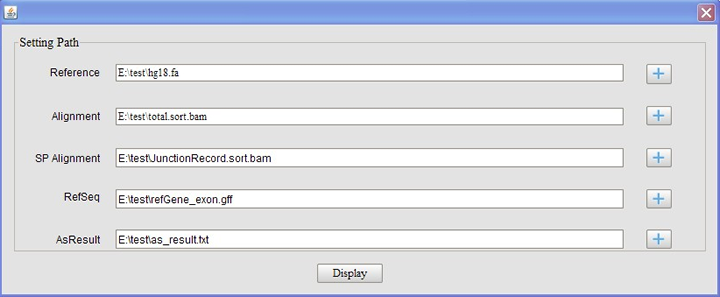
The input of the viewer contains five files: the reference genome sequence, the sorted and indexed BAM file generated in step 1, the sorted and indexed BAM file containing the junction reads supporting the AS result, the RefGene in GFF format, and the AS result file generated by previous step.
-
Menus
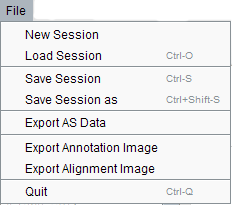
New session – for fist time use, click new session to provide a reference file in fasta format, a alignment file containing the reads mapping to the reference genome in BAM format, a alignment file containing the reads mapping to the splice site junction sequence in BAM format, RefGene annotation files in GFF format, alternative splicing event patterns result file generated by the pipeline. Click “display” button, loading file process will finish in a few seconds. Then the main page displayed as above.
Load session - quickly opens an existing session saved as a log file.
Save session - save current session.
Save session as - allows you to choose a new name, directory to save the session
Export AS data- export the AS pattern result as the tabulated format.
Export Annotation image- export annotation track image in PDF format.
Export Alignment image- export annotation track image in PDF format.
Quit - exits the application.
-
View Menu

Showing annotation: options for showing annotation track and gene list.
Showing Coverage: options for showing coverage
Showing Reference: options for showing reference
Showing Alignment: options for showing alignment
-
Settings Menu
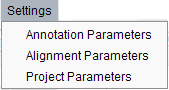
Annotation parameters: provide user-defined parameters highly configurable allowing users to define view mode, arrow mode, read height, color, vertical space, change track display height and background color. Annotation tracks: functions for reordering of track location and add/delete related tracks.

Alignment parameters: users can change font and colors in many different combinations, such as each base and background color. Zooming can be performed by choosing from the settings menu or using toolbar buttons "+" and "-".

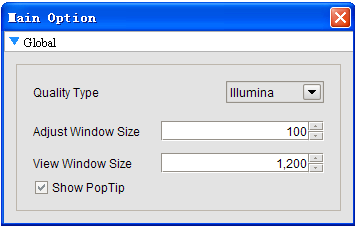
Project Parameters: users can change the Quality type, Adjust Window size and view windows size, and can set whether to show the poptip.
-
Help
-
Toolbars
Several basic items can be found on the toolbars. You can use these tool bars for zooming in/out, selecting current chromosome or coordinate settings etc.

- RefGene id and AS event id panel
When you have established or opened a session, the RefGene id and AS event id will be shown in the left panel of viewer. The id item can be clicked and the alignment track and annotation track will be jump to the according sites in the right panel. You can also search the gene by the id or name.

- Annotation track panel
The AS events and RefGene are shown graphically in this annotation track panel located in up-right of the viewer. you can view the junctions mapping reads when you mouse suspend on and click the polyline, indicating the junction, and the support junction mapping reads will be shown in the
popup dialog. The seven alternative splicing event patterns is shown in the following shape.
- Alignment track panel
The alignment track panel contains three sub panels: the depth of coverage panel, the reference genome sequence panel, and the alignment panel.
A step by step documentation for the test data application will come soon!
|
